Difference between physical standby database in a Data Guard and Active Data Guard

The difference between physical standby database in a Data Guard and Active Data Guard is as bit confusing.  Few DBAs assumes that active Data Guard need different configuration and implementation plan.  Few thinks both are same. As a DBA it is very focal to understand the difference, as active Data Guard involves license cost.  In this article I take a quick tour to make you all understand the overall difference of physical standby database in a Data Guard and Active Data Guard.

Data Guard

Data Guard provides the management, monitoring, and automation software to create and maintain one or more synchronized copies of a production database to protect Oracle data from failures, disasters, human error, and data corruptions while providing high availability for mission critical applications. Data Guard is included with Oracle Database Enterprise Edition. Oracle Data Guard forms an extension to the Oracle RDBMS. It aids in establishing and maintaining secondary “standby databases” as alternative/supplementary repositories to production “primary databases”.

Data Guard supports both physical standby and logical standby sites. Oracle Corporation makes Data Guard available only as a bundled feature included within its “Enterprise Edition” of the Oracle RDBMS.

Active Data Guard

Active Data Guard is an option license for Oracle Database Enterprise Edition. Active Data Guard enables advanced capabilities that that extend basic Data Guard functionality. These include:

  • Real-Time Query – offload read-only workloads to an up-to-date standby database.
  • Automatic Block Repair – automatic repair of physical corruption transparent to the user.
  • Far Sync – zero data loss protection across any distance.
  • Standby Block Change Tracking – enable incremental backups on an active standby.
  • Active Data Guard Rolling Upgrade – make it simple to reduce planned downtime.
  • Global Database Services – load balancing and service management across replicated databases.
  • Application Continuity – make outages transparent to users.

If a physical standby database in a Data Guard configuration has any of the above features enabled, then the Active Data Guard option must be licensed for every such physical standby, and also for the primary database. Yes, what you read is right “must be licensed for every such physical standby, and also for the primary database”.

Below are the commands can give you more insight for DBA to understand  on Physical database in the Data Guard and Active Data Guard

 How to start physical standby database in a Data Guard

  1. Bring Database in Mount State.
  2. Put database in recovery mode.

Commands:

SQL> startup mount
SQL> alter database recover managed standby database using current logfile disconnect from session; – (11G and lesser version)   

SQL alter database recover managed standby database disconnect from session;  – Note: USING CURRENT LOGFILE is already deprecated for start command Real-Time Apply on Oracle Database 12c (12.1).

How to start Active Data Guard database in a Data Guard

  1. Start the database in open mode.
  2. Put database in recovery mode.

Commands:

SQL> startup open;
SQL> alter database recover managed standby database using current logfile disconnect from session;   -(11G and  lesser version)  

SQL> alter database recover managed standby database disconnect from session;  – Note: USING CURRENT LOGFILE is already deprecated for start command Real-Time Apply on Oracle Database 12c (12.1).

Conversion from Physical standby to Active Data Guard
We can convert the physical standby  into active Data Guard standby . Below are the steps

  1. Stop Apply Services.
  2. Shut the database.
  3. Start the database in open mode.
  4. Put database in recovery mode.

SQL> alter database recover managed standby database cancel;
SQL> shut immediate;

SQL> startup open;
SQL> alter database recover managed standby database using current logfile disconnect from session;  -(11G and  lesser version)  

SQL> alter database recover managed standby database disconnect from session;  – Note: USING CURRENT LOGFILE is already deprecated for start command Real-Time Apply on Oracle Database 12c (12.1).

It enables us to have a physical standby read only open, while redo apply is still done in the background.

How to Check if Active Data Guard is Enabled or Not 

Use the following query to confirm that Data Guard is in active mode:

From standby database

SQL> select open_mode,controlfile_type from v$database;

OPEN_MODE                                        CONTROLFILE


READ ONLY WITH APPLY                      STANDBY

This means Active Data Guard is enabled

SQL> select open_mode,controlfile_type from v$database;

OPEN_MODE                                       CONTROLFILE


Mounted                                                STANDBY

This means Active Data Guard is not enabled

In short physical standby database in Data Guard will be in mount mode and Active Data Guard will be in READ ONLY WITH APPLY mode.

                                                                ***


Physical Standby Processes Architecture (Apply Redo Logs)

A physical standby database is an exact, block-for-block copy of a primary database. A physical standby is maintained as an exact copy through a process called Redo Apply, in which redo data received from a primary database is continuously applied to a physical standby database using the database recovery mechanisms.This also means that rowids stay the same in a physical standby database environment.

A physical standby database can be opened for read-only access and used to offload queries from a primary database. If a license for the Oracle Active Data Guard option has been purchased, Redo Apply can be active while the physical standby database is open, thus allowing queries to return results that are identical to what would be returned from the primary database. This capability is known as the real-time query feature.

How Physical Standby works 

On the Primary database site

The log writer process (LGWR) collects transactions from the log buffer and writes to the online redo logs.

The archiver process (ARCH) creates a copy of the online redo logs, and writes to the local archive destination.

Depending on the configuration, the archiver process or log writer process can also transmit redo logs to standby database. When using the log writer process, you can specify synchronous or asynchronous network transmission of redo logs to remote destinations.

Data Guard achieves asynchronous network I/O using LGWR network server process (LNS). These network severs processes are deployed by LOG_ARCHIVE_DEST_n initialization parameter.

Data Guard’s asynchronous log transport (i.e. the Maximum Performance mode) is recommended for a configuration in which the network distance is up to thousands of miles, providing continual maximum performance, while minimizing the risks of transaction loss in the event of a disaster.

On the Standby database site

The remote file server process (RFS) receives archived redo logs from the primary database. The primary site launches the RFS process during the first log transfer.

The redo logs information received by the RFS process can be stored as either standby redo logs or archived redo logs. Data Guard introduces the concept of standby redo logs (separate pool of log file groups).

Standby redo logs must be archived by the ARCH process to the standby archived destination before the managed recovery process (MRP) applies redo log information to the standby database.

The fetch archive log (FAL) client is the MRP process. The fetch archive log (FAL) server is a foreground process that runs on the primary database and services the fetch archive log requests coming from the FAL client. A separate FAL server is created for each incoming FAL client. FAL_SERVER specifies the FAL (fetch archive log) server for a standby database. The value is an Oracle Net service name, which is assumed to be configured properly on the standby database system to point to the desired FAL server.FAL_CLIENT specifies the FAL (fetch archive log) client name that is used by the FAL service, configured through the FAL_SERVER parameter, to refer to the FAL client. The value is an Oracle Net service name, which is assumed to be configured properly on the FAL server system to point to the FAL client (standby database). Thanks to the FAL_CLIENT and FAL_SERVER parameters, the managed-recovery process in the physical database will automatically check and resolve gaps at the time redo is applied. This helps in the sense that you don’t need to perform the transfer of those gaps by yourself. FAL_CLIENT and FAL_SERVER only need to be defined in the initialization parameter file for the standby database(s). It is possible; however, to define these two parameters in the initialization parameter for the primary database server to ease the amount of work that would need to be performed if the primary database were required to transition its role.

Prior to Oracle 11g, Redo Apply only worked with the standby database in the MOUNT state, preventing queries against the physical standby whilst media recovery was in progress. This has changed in Oracle 11g.When using Data Guard Broker (DG_BROKER_START = TRUE), the monitor agent process named Data Guard Broker Monitor (DMON) is running on every site (primary and standby) and maintain a two-way communication.

standby2

Protection Mode

 Maximum Protection

This mode offers the highest level of data protection. Data is synchronously transmitted to the standby database from the primary database and transactions are not committed on the primary database unless the redo data is available on at least one standby database configured in this mode. If the last standby database configured in this mode becomes unavailable, processing stops on the primary database. This mode ensures no-data-loss.

Because this data protection mode prioritizes data protection over primary database availability, Oracle recommends that a minimum of two standby databases be used to protect a primary database that runs in maximum protection mode to prevent a single standby database failure from causing the primary database to shut down.

Maximum Availability

This protection mode provides the highest level of data protection that is possible without compromising the availability of a primary database. Under normal operations, transactions do not commit until all redo data needed to recover those transactions has been written to the online redo log AND based on user configuration, one of the following is true:

  • redo has been received at the standby, I/O to the standby redo log has been initiated, and acknowledgement sent back to primary
  • redo has been received and written to standby redo log at the standby and acknowledgement sent back to primary

If the primary does not receive acknowledgement from at least one synchronized standby, then it operates as if it were in maximum performance mode to preserve primary database availability until it is again able to write its redo stream to a synchronized standby database.

 If the primary database fails, then this mode ensures no data loss will occur provided there is at least one synchronized standby in the Oracle Data Guard configuration.  

Transactions on the primary are considered protected as soon as Oracle Data Guard has written the redo data to persistent storage in a standby redo log file. Once that is done, acknowledgment is quickly made back to the primary database so that it can proceed to the next transaction. This minimizes the impact of synchronous transport on primary database throughput and response time. To fully benefit from complete Oracle Data Guard validation at the standby database, be sure to operate in real-time apply mode so that redo changes are applied to the standby database as fast as they are received. Oracle Data Guard signals any corruptions that are detected so that immediate corrective action can be taken.

Maximum Performance

This mode offers slightly less data protection on the primary database, but higher performance than maximum availability mode. In this mode, as the primary database processes transactions, redo data is asynchronously shipped to the standby database. The commit operation of the primary database does not wait for the standby database to acknowledge receipt of redo data before completing write operations on the primary database. If any standby destination becomes unavailable, processing continues on the primary database and there is little effect on primary database performance. This is the default mode.

Performance Versus Protection in Maximum Availability Mode

When you use Maximum Availability mode, it is important to understand the possible results of using the LOG_ARCHIVE_DEST_n attributes SYNC/AFFIRM versus SYNC/NOAFFIRM(FastSync) so that you can make the choice best suited to your needs.

When a transport is performed using SYNC/AFFIRM, the primary performs write operations and waits for acknowledgment that the redo has been transmitted synchronously to the physical standby and written to disk. A SYNC/AFFIRM transport provides an additional protection benefit at the expense of a performance impact caused by the time required to complete the I/O to the standby redo log.

When a transport is performed using SYNC/NOAFFIRM, the primary performs write operations and waits only for acknowledgement that the data has been received on the standby,not that it has been written to disk. The SYNC/NOAFFIRM transport can provide a performance benefit at the expense of potential exposure to data loss in a special case of multiple simultaneous failures.

With those definitions in mind, suppose you experience a catastrophic failure at the primary site at the same time that power is lost at the standby site. Whether data is lost depends on the transport mode being used. In the case of SYNC/AFFIRM, in which there is a check to confirm that data is written to disk on the standby, there would be no data loss because the data would be available on the standby when the system was recovered. In the case of SYNC/NOAFFIRM, in which there is no check that data has been written to disk on the standby, there may be some data loss.

Archiving to Local Destinations Before Archiving to Remote Destinations

default_archiving

LGWR SYNC Archival to a Remote Destination with Standby Redo Log Files

lgwrsync

LGWR ASYNC Archival with Network Server (LNSn) Processes

lgwrasync.gif

Acronyms

Acronym Short For
ARC0 Archiver Process on Local Server
ARCH Archiver
ASYNC Asynchronous
DMON Data Guard Monitor
DR Disaster Recovery
FAL Fetch Archive Log
LCR Logical Change Record
LGWR Logwriter
LNS Network Server Process
LSP Logical Standby Process (SQL Apply for Logical DG)
MRP Managed Recovery Process (Redo Apply for Physical DG)
RFS Remote File Server
SYNC Synchronous
TAF Transparent Application Failover

Step by Step approach to create an Oracle 12c Data Guard Active Standby Database (Multitenant Database – 4 Node RAC)

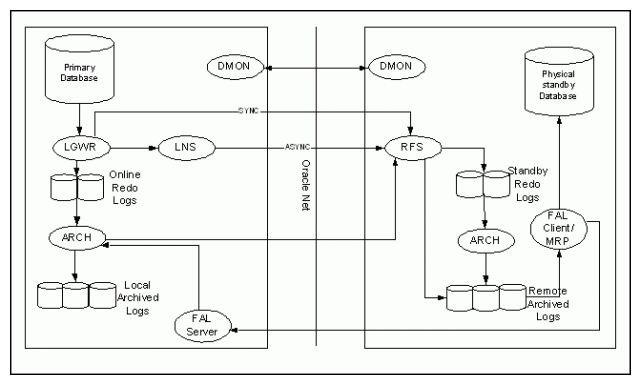
In this post I have demonstrated Step by Step approach to create an Oracle 12c Data Guard Active Standby Database.

Environment Setup details

  • Primary database  up and running on 4 node RAC
  • Data files, OCR and voting Disks(in separate DG)  are in ASM storage.
  • Binaries are in  files system .
  • DB Password files and init<sid>.ora  files are in  $ORACLE_HOME/dbs
  • Installed and Configured Grid Infra on Standby machines, 4 Node RAC.
  • OCR and voting Disks(in separate DG)  are in ASM storage.
  • Created required Disk group on Standby site for data files.
  • RDBMS software installed in standby machines.
  • Ensured Network connectivity between PRIMARY and STANDBY server (TCP/IP – Port 1521 & 1525).

Environment details – Primary Databases

OS Version: Linux 6.2
Oracle Version: 12.1.0.2
Host Server: LABPRD1, LABPRD2, LABPRD3, LABPRD4
Primary DB : PRASPRD Instances : PRASPRD1,PRASPRD2,PRASPRD3,PRASPRD4
Storage System: ASM for Data Storage and Filesystem for Binaries
Grid Home(Binaries): /prasprd/gridinfra/grid1
RDBMS Home(Binaries) :/prasprd/db/db1
Disk Groups: CRS1(High Redundancy, For OCR and Voting Disk), LABDATA2(Data files, Red logs and Control files)

Environment details – Standby Databases

OS Version: Linux 6.2
Oracle Version: 12.1.0.2
Host Server : LABSBY1, LABSBY2, LABSBY3, LABSBY4
Primary DB : PRASSBY   Instances : PRASPRD1,PRASPRD2,PRASPRD3,PRASPRD4
Storage System: ASM for Data Storage and Filesystem for Binaries
Grid Home(Binaries): /prasprd/gridinfra/grid1
RDBMS Home(Binaries) :/prasprd/db/db1
Disk Groups: CRS1(High Redundancy, For OCR and Voting Disk), LABDATA3(Data files, Red logs and Control files)

Procedure

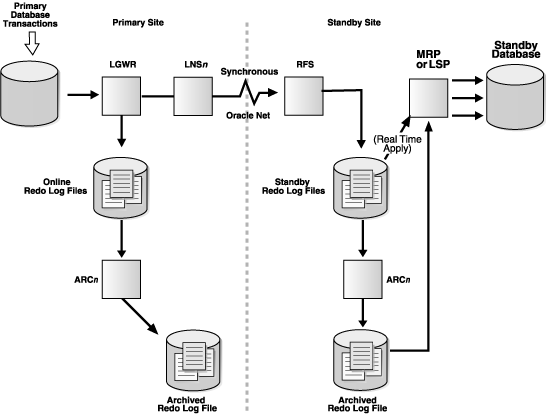
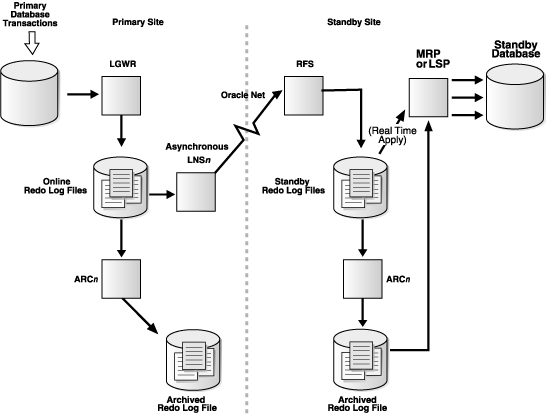
  1. Enable force logging in PRIMARY.
  2. Create SRL (standby redo logs) in PRIMARY.
  3. Copy init and password file from primary to STANDBY.
  4. Create directory structure in STANDBY.
  5. Make Standby parameter changes in the parameter file of PRIMARY.
  6. Make Standby parameter changes in the parameter file of STANDBY.
  7. Add an entry in the oratab file
  8. Establish the connectivity between PRIMARY and STANDBY.
  9. Start the STANDBY instance
  10. Use RMAN duplicate to create standby database from PRIMARY database.
  11. Start the MRP process in STANDBY.
  12. Verify whether the log are shipped and applied properly @the STANDBY.
  13. Start other standby RAC nodes.
  14. Verify Pluggable database’s status.

Step by Step Active Standby Build

1.       Enable force logging on PRIMARY

SQL> alter database force logging;

2.       Configure Standby Redo Log on PRIMARY

 a. Check the log files and sizes.

SQL>SELECT GROUP#, BYTES FROM V$LOG;

b. Create SRL

SQL> ALTER DATABASE ADD STANDBY LOGFILE  THREAD <TN> GROUP <GN>  (‘/path/<File Name>’,  ‘/path/<File Name>’   )  SIZE  <S> ;

NOTE: SIZE OF STANDBY LOG FILE SHOULD BE SAME AS ONLINE LOG FILE

 c. Verify the standby redo log file groups were created .Verify this in standby after standby build.

SQL> SELECT GROUP#, THREAD#, SEQUENCE#, ARCHIVED, STATUS FROM V$STANDBY_LOG;

(Primary)

GROUP# THREAD# SEQUENCE# ARC STATUS
9 1 0 YES UNASSIGNED
10 1 0 YES UNASSIGNED
11 2 0 YES UNASSIGNED
12 2 0 YES UNASSIGNED
13 3 0 YES UNASSIGNED
14 3 0 YES UNASSIGNED
15 4 0 YES UNASSIGNED
16 4 0 YES UNASSIGNED

(Standby – Below table output  after the standby is created)

GROUP# THREAD# SEQUENCE# ARC STATUS
9 1 0 YES UNASSIGNED
10 1 509 YES ACTIVE
11 2 0 YES UNASSIGNED
12 2 298 YES ACTIVE
13 3 0 YES UNASSIGNED
14 3 500 YES ACTIVE
15 4 0 YES UNASSIGNED
16 4 287 YES ACTIVE

**Here I have 4 nodes having 2 redo groups each node, total 8 groups; created 8 more standby log groups 2 per node.

3.       Copy init and password file from primary to standby

Copy initPRASPRD1.ora to standby database (all 4 Nodes), name of init<sid>.ora needs to be changed depends on instance names

          Copy the password file orapwPRASPRD1 from primary to standby database (all 4 nodes), name of init needs to be changed depends on instance names

4.       Create directory structure in standby

 $ mkdir -p  /u01/app/oracle/admin/prasprd/adump (on all 4 node)

5.       Make Standby parameter changes in the parameter file of PRIMARY. 

Add below entries in the  init<sid>.ora.(Make the entry in one Node pfile and copy to other nodes)

$ cat initprasprd1.ora
 ##########DG Enrty ################
*.log_archive_max_processes='8'
*.db_unique_name=PRASPRD'
*.log_archive_config='dg_config=(PRASSBY,PRASPRD)'
*.log_archive_dest_1='location=+LABDATA2 valid_for=(all_logfiles,all_roles)
*.log_Archive_dest_2='service=PRASSBY_DR async noaffirm reopen=15 valid_for=(all_logfiles,primary_role) db_unique_name=PRASSBY'
*.log_file_name_convert='+LABDATA3','+LABDATA2'
*.db_file_name_convert='+LABDATA3','+LABDATA2'
*.fal_server=PRASSBY_DR;
*.fal_client=PRASPRD;
#############DG Entry ############################

 6.       Make Standby parameter changes in the parameter file of Standby                                     

Add below entries in the  init<sid>.ora.(Make the entry in one Node pfile and copy to other nodes)


$ cat initprasprd1.ora
##########DG Enrty ################
*.log_archive_max_processes='8'
*.db_unique_name='PRASSBY'
*.standby_file_management='AUTO'
*.log_archive_config='dg_config=(PRASPRD,PRASSBY)'
*.log_archive_dest_1='location=+LABDATA3 valid_for=(all_logfiles,all_roles) db_unique_name=PRASSBY'
*.log_Archive_dest_2='service=PRASPRD async noaffirm reopen=15 valid_for=(all_logfiles,primary_role) db_unique_name=PRASPRD'
*.log_file_name_convert='+LABDATA2','+LABDATA3'
*.db_file_name_convert='+LABDATA2','+LABDATA3'
*.fal_server=PRASPRD
*.fal_client=PRASSBY_DR
#############DG Entry ############################

7.       Add an entry in the oratab file

PRASPRD1: /prasprd/db/db1: N  (Node1)
PRASPRD2: /prasprd/db/db1: N  (Node2)
PRASPRD3: /prasprd/db/db1: N  (Node3)
PRASPRD4: /prasprd/db/db1: N  (Node4)

8.       Establish the connectivity between PRIMARY and STANDBY.   

On Standby (Add a static entry in the listener.ora for PRASSBY)


LISTENER12C =
  (DESCRIPTION_LIST =
    (DESCRIPTION =
      (ADDRESS = (PROTOCOL = TCP)(HOST =LABSBY1.me.domain)(PORT = 1525))
      (ADDRESS = (PROTOCOL = IPC)(KEY = EXTPROC1525))
    )
  )
SID_LIST_LISTENER12C =
  (SID_LIST =
 (SID_DESC =
      (GLOBAL_DBNAME = PRASSBY)
      (ORACLE_HOME = /prasprd/db/db1)
      (SID_NAME = PRASPRD1)
    )
 )

Reload the listener

$ lsnrctl reload listener12c
 LSNRCTL for Linux: Version 12.1.0.2.0 - Production on Tue Jan 6 12:11:31 2015
 Copyright (c) 1991, 2014, Oracle.  All rights reserved.
 Connecting to (DESCRIPTION=(ADDRESS=(PROTOCOL=TCP)(HOST= LABPRD1.me.domain) (PORT=1525)))
The command completed successfully

On Primary (Add a below entry on tnsnames.ora)

PRASSBY_DR =
  (DESCRIPTION =
    (ADDRESS = (PROTOCOL = TCP)(HOST = LABSBY1.me.domain)(PORT = 1525))
    (CONNECT_DATA =
      (SERVER = DEDICATED)
      (SERVICE_NAME =PRASSBY)
    )
  )
 PRASPRD =
  (DESCRIPTION =
    (ADDRESS = (PROTOCOL = TCP)(HOST =LABPRD1.corporate.domain)(PORT = 1525))
    (CONNECT_DATA =
      (SERVER = DEDICATED)
      (SERVICE_NAME = PRASPRD)
    )
  )
 On Standby(Add a below entry on tnsnames.ora)
PRASSBY_DR =
  (DESCRIPTION =
    (ADDRESS = (PROTOCOL = TCP)(HOST = LABSBY1.corporate.domain)(PORT = 1525))
    (CONNECT_DATA =
      (SERVER = DEDICATED)
      (SERVICE_NAME =PRASSBY)
    )
  )
PRASPRD =
  (DESCRIPTION =
    (ADDRESS = (PROTOCOL = TCP)(HOST =LABPRD1.corporate.domain)(PORT = 1525))
    (CONNECT_DATA =
      (SERVER = DEDICATED)
      (SERVICE_NAME = PRASPRD)
    )
  )
 

9.       Start the STANDBY database instance.

 $ . oraenv

ORACLE_SID = [prasprd1] ? prasprd1
The Oracle base has been set to /u01/app/orabase
 oradb@PRASSBY1.ME.DOMAIN:/home/oradb ~]sqlplus / as sysdba
 SQL*Plus: Release 12.1.0.2.0 Production on Tue Jan 6 12:11:31 2015
 Copyright (c) 1982, 2014, Oracle.  All rights reserved.
 Connected to an idle instance.
 SQL> startup nomount;
 ORACLE instance started.
Total System Global Area  XXXXXXXXX bytes
Fixed Size                  XXXXXXX bytes
Variable Size             XXXXXXXXX bytes
Database Buffers           XXXXXXXX bytes
Redo Buffers                XXXXXXX bytes

10.       Use RMAN duplicate to create standby database on Primary database.

Recovery Manager: Release 12.1.0.2.0 – Production on Tue Jan 6 14:40:12 2015 Copyright (c) 1982, 2014, Oracle and/or its affiliates.  All rights reserved.


RMAN> connect target sys/*****@PRASPRD connected to target database: PRASPRD (DBID=2845711114)


RMAN> connect auxiliary sys/*****@PRASSBY_DR


connected to auxiliary database: PRASPRD (not mounted)


run


{ allocate channel c1 type disk;


allocate channel c2 type disk;


allocate auxiliary channel aux type disk;


duplicate target database for standby from active database;


alter system set log_archive_max_processes=’8′;


alter system set db_unique_name=’PRASSBY’;


alter system standby_file_management=’AUTO’;


alter system set log_archive_config=’dg_config=(PRASPRD,PRASSBY)’;


alter system set log_archive_dest_1=’location=USE_DB_RECOVERY_FILE_DEST valid_for=(all_logfiles,all_roles) db_unique_name=PRASSBY’;


alter system set log_Archive_dest_2=’service=prasprd async noaffirm reopen=15 valid_for=(all_logfiles,primary_role) db_unique_name=PRASPRD’;


log_file_name_convert=’+LABDATA3′,’+LABDATA2′


db_file_name_convert=’+LABDATA3′,’+LABDATA2′ }

11.   Start the MRP process on standby database

SQL> startup ;
ORACLE instance started.
Total System Global Area  XXXXXXXXX bytes
Fixed Size                  XXXXXXX bytes
Variable Size              XXXXXXXXX bytes
Database Buffers            XXXXXXXXX bytes
Redo Buffers                 XXXXXXX bytes
Database mounted.
Database opened. SQL> ALTER DATABASE RECOVER MANAGED STANDBY DATABASE DISCONNECT FROM SESSION;

                      Media recovery complete

12.       Verify MRP process on standby database

oradb@LABPRD.CORPORATE.DOMAIN:/home/oradb ~]ps -ef | grep mrp
oradb    23678     1  0 Jan05 ?        00:00:05 ora_mrp0_prasprd1

 SQL> select process,status,thread#,sequence#,blocks from v$managed_standby where process like ‘%MRP%’;

PROCESS STATUS THREAD# SEQUENCE# BLOCKS
MRP0 APPLYING_LOG 1 498 102400

13.     Verify whether the log are shipped and applied properly @the standby.

On Primary

SQL> ALTER SYSTEM SWITCH LOGFILE;

SQL > select thread#, max(sequence#) “Last Primary Seq Generated”

           From v$archived_log val, v$database vdb

           where val.resetlogs_change# = vdb.resetlogs_change#

             group by thread# order by 1;

THREAD# LAST  PRIMARY SEQ GENERATED
1 497
2 283
3 484
4 277


On Standby

SELECT ARCH.THREAD# “Thread”, ARCH.SEQUENCE#

“Last Sequence Received”,

APPL.SEQUENCE# “Last Sequence Applied”,

(ARCH.SEQUENCE# – APPL.SEQUENCE#) “Difference”

FROM

(SELECT THREAD# ,SEQUENCE# FROM V$ARCHIVED_LOG

WHERE

(THREAD#,FIRST_TIME )

 IN (SELECT THREAD#,MAX(FIRST_TIME)

FROM V$ARCHIVED_LOG GROUP BY THREAD#))

ARCH,(SELECT THREAD# ,SEQUENCE#

FROM V$LOG_HISTORY

WHERE (THREAD#,FIRST_TIME )

 IN (SELECT THREAD#,MAX(FIRST_TIME) FROM V$LOG_HISTORY

GROUP BY THREAD#)) APPL

WHERE ARCH.THREAD# = APPL.THREAD# ORDER BY 1;

THREAD# LAST SEQUENCE RECEIVED LAST SEQUENCE APPLIED DIFFERENCE
1 497 497 0
2 283 283 0
3 484 484 0
4 277 277 0

14.        Startup other RAC standby node.

SQL> startup open;

15.      Check pluggable database and status in PRIMARY and STANDBY.

On Primary


 SQL> select name, open_mode from v$pdbs; or show pdbs
NAME OPEN_MODE
PDB$SEED READ ONLY
PDB1 MOUNTED
PDB2 MOUNTED

 On Standby

 SQL> select name, open_mode from v$pdbs; or show pdbs
NAME OPEN_MODE
PDB$SEED READ ONLY
PDB1 MOUNTED
PDB2 MOUNTED


16.       Check database ROLE

 On Primary

 SQL> select NAME, DATABASE_ROLE, SWITCHOVER_STATUS,DB_UNIQUE_NAME,CDB,CON_ID from v$database;


NAME DATABASE_ROLE SWITCHOVER_STATUS DB_UNIQUE_NAME CDB CON_ID
CDBORCL PRIMARY TO STANDBY cdborcl YES 0


On Standby

             SQL> select NAME, DATABASE_ROLE, SWITCHOVER_STATUS,DB_UNIQUE_NAME,CDB,CON_ID from v$database;

NAME DATABASE_ROLE
SWITCHOVER_STATUS DB_UNIQUE_NAME CDB CON_ID
CDBORCL PHYSICAL STANDBY NOT ALLOWED cdborcdr YES 0


17.       Confirm that the primary database protection mode


SQL> SELECT PROTECTION_MODE FROM V$DATABASE;

PROTECTION_MODE

——————————-

MAXIMUM PERFORMANCE

 ——————> At this point Physical standby creation completed ! Congrats.

Test SCENARIOS

=============

 You can do several test scenarios to make sure changes are getting shipped to standby location.

  • ·         Test 1 – Create Table on any PDB schema can verify the changes take effect on Standby site.

Primary

Create a table, insert some values

Standby

 1. alter pluggable database all open read only;

                  2.  Connect to PDB .

                  3. Select count (*) from schema.tablename

  • ·         Test 2 – Clone a PDB and verify the changes take effect on Standby site.

Primary

CREATE PLUGGABLE DATABASE pdb2 ADMIN USER pdb2adm IDENTIFIED BY meadmin;

SQL> select name, open_mode from v$pdbs; or show pdbs;

Standby

1.       Verify Alert log
2.  SQL> select name, open_mode from v$pdbs; or show pdbs;
Reference
  • In this exercise we are bringing up standby database on PRASSBY i.e. on HOST LABSBY1.
  • LISTENER 12c – This is a static Listener to build standby database and used 1525 port.
  • PRASSBY_DR – Connect String to Connect DG Instance for Standby Build and Log Shipping
  • PRASPRD – Connect String to Connect Primary Instance for Standby Build and Log Shipping

Standby Redologs

What is Standby Redo Logs?

 Standby Redo Logs (SRL) is similar to Online Redo Log (ORL). Only difference between two is that Standby Redo Log is used to store redo data received from another database (primary database).

The SRL files are where the Remote File Server (RFS) process at your standby database writes the incoming redo so that it is persistent on disk for recovery. SRL files are important for better redo transport performance and data protection. SRL are MUST in Maximum Availability or Maximum Protection mode and OPTIONAL (but recommended) in Maximum Performance mode.If there are no Standby Redo Log (SRL) files, then at each log switch in the primary database,the RFS process on the standby database that is serving an asynchronous standby destination has to create an archive log of the right size. While the RFS is busy doing creating the archive log file, the LNS process at the primary database has to wait, getting further and further behind the LGWR (in case of Maximum Performance mode). That is why it recommended to have Standby Redo Log (SRL) files in Maximum Performance mode also.

We generally configure them on our primary database as well in preparation for a role transition b/w primary-standby.Also, do not multiplex SRLs. Since Data Guard will immediately request.

 Why Standby Red Logs Needed?

 Prior to 10G Oracle Data Guard used to have an issue of losing the last redo log during catastrophic instance failure. If the primary instance is crashed or lost, the “current” redo log (as written by the LGWR process) in primary database redo log file, halts at the primary site. Archive file did not get generated on primary for the data which is in Redo log file, this data is not applied on standby and there would be the data loss forever on standby in case of primary site is lost.

 To avoid such situation In Oracle 10g and beyond we see an exciting new approach to Data Guard management whereby we write the current redo log to a “standby redo log”, allowing complete recovery in cases of catastrophic instance failure. A standby redo log resides on the standby database site. The standby redo log file is similar to an online redo log, except that a standby redo log is used to store redo data that has been received from a primary database.

In what scenarios Standby Redo Logs are required ?

Standby Redo Log is required if

1) Your standby database is in maximum protection or maximum availability mode.

2) If you are using Real-Time Apply on Standby Database.

3) If you are using Cascaded Destinations.